
Understanding Wall Hanging Eye Screw Types and Material Compatibility
Types of eye screws and their applications
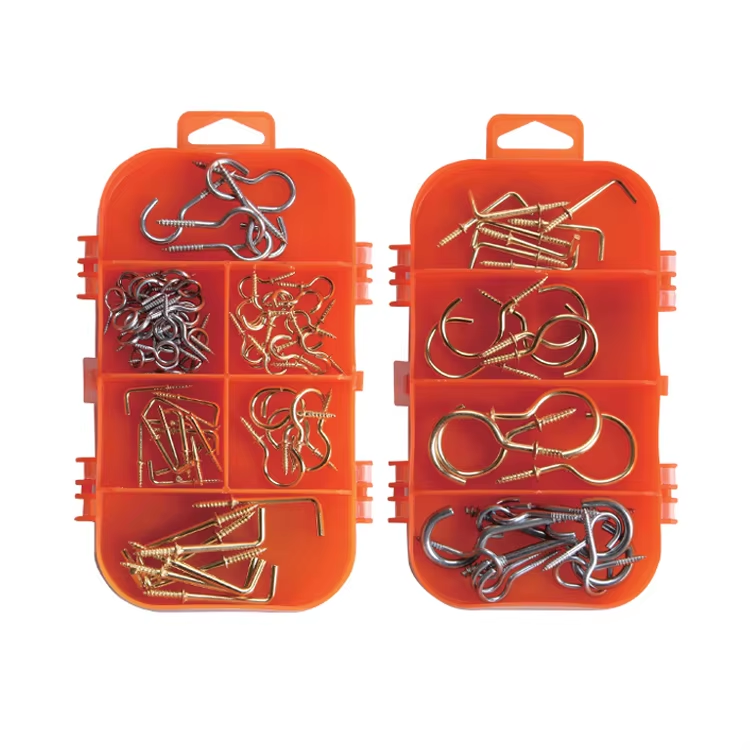
Eye screws for walls come in different varieties depending on what they need to hold and where they'll be mounted. The basic screw eyes with just a simple loop work great for light stuff around the house, anything under about 10 pounds like picture frames or maybe some small hooks. When dealing with heavier items between 20 to 100 pounds such as mirrors or bookshelves, lag eye bolts are the way to go. These have those rough threads and a hexagonal bottom that grabs onto wooden studs really well. Shoulder eye bolts are special because they handle diagonal forces better, so they're good when something might swing or hang at an angle. For mounting things in brick or concrete walls, we recommend anchor eye bolts with those built-in expansion sleeves that lock tightly into the material. There are also some specialty options worth mentioning too. Roller eyes let cables move freely in exhibition setups, and pig-tail designs make it easy to take things down quickly when needed for temporary displays.
Threaded shank designs for secure attachment
How the threads are designed on a wall hanging eye screw really affects how well it holds and resists coming out when pulled. The coarse threads work best in wood because they push aside the fibers as they go in, creating a solid grip without splitting the material. For metal studs or those threaded inserts, fine threads get the job done better since they fit into the existing threads more precisely. Some screws have self tapping shanks that basically make their own hole in things like concrete or other hard stuff, so there's less need to drill first. When looking at partially threaded vs fully threaded options, the partially threaded ones tend to be stronger where the weight actually sits, whereas fully threaded ones don't wiggle around as much in hollow walls. Tapered ends help everything slide in smoothly, and those special keyed or knurled shanks prevent twisting even when there's movement happening over time, which makes these fasteners last longer in real world conditions.
Load capacity and strength ratings of wall hanging eye screws
Load capacity depends on material, diameter, and installation method. Residential-grade eye screws typically support 25–75 lbs, while commercial-grade versions exceed 200 lbs. A 4:1 safety margin is standard—never load beyond 25% of the rated capacity.
Matching eye screws to wall types: drywall, plaster, and masonry
Getting the right eye screw and anchor combo matters a lot when it comes to keeping walls intact. Drywall situations usually call for those rough threaded plastic anchors or maybe toggle bolts since they spread out the weight better in the hollow space behind the wall. When dealing with old fashioned plaster over wood lath, go for wider threads on the screws so they grab hold of the wooden framework underneath without breaking through the fragile plaster surface. Masonry work needs special expansion anchors though. Brick typically works well with lead sleeves, concrete gets along with wedge anchors, and for really heavy stuff, epoxy set bolts do the trick. A good tip worth remembering? Drill those pilot holes about 80% the size of the actual bolt shaft. This helps get things started smoothly without tearing up the material around it, which can cause cracks down the road if done wrong.
Evaluating Wall Structure and Load-Bearing Requirements
Identifying studs vs. hollow walls using a stud finder
A good way to find those hidden wooden or metal frames behind walls is by using a stud finder. Move it across the wall surface until it starts beeping or lighting up, which means there's something solid behind there where we can hang stuff directly. Most homes have these support beams set either 16 inches or sometimes 24 inches apart, so keep that in mind when scanning. When the detector stays quiet, that's probably just empty space between the beams, and we'll need special anchors to make sure whatever gets hung there stays put. If dealing with old fashioned plaster walls instead of drywall, invest in one of those deeper scanning tools to prevent cracking the delicate surface during installation. And don't forget to double check everything with a tiny test hole first, just to confirm what kind of beam we're actually dealing with and how thick it really is before drilling all the way through for good.
When to use wall anchors versus direct stud mounting
Mounting directly onto studs remains the most secure option, especially when dealing with anything heavier than 25 pounds. For best results, hammer those wall hanging eye screws right into the middle of wooden studs where they'll grip strongest. When working with hollow drywall or plaster walls, different approaches work better. Plastic anchors handle lighter stuff under 20 pounds while toggle bolts can manage medium weight items up to around 100 pounds. Don't rely solely on anchors for anything over 50 pounds though. Most folks make mistakes here by not using multiple anchor points or spreading out the load with proper hardware. Whenever possible, go for that stud mount connection first. Experience shows it makes all the difference in how long things stay put on walls.
Weight support limits and safety margins for secure hanging
Standard wood studs typically hold between 75 to 125 pounds when using a properly installed wall hanging eye screw. Concrete anchors vary quite a bit but generally range from 100 to 300 pounds depending on how deep they're set and what kind of anchor is used. When hanging anything on walls, always go with at least a 4 to 1 safety factor. That means if something weighs 40 pounds, we need hardware rated for around 160 pounds minimum. Don't forget about those extra stresses either. Things that move around or vibrate can cut down the actual holding power by as much as 30 percent over time. For those beautiful gallery walls many people love today, spread out the weight across several screws instead of putting everything on one spot. Mounting rails work wonders here too, helping keep things level while preventing stress points that might cause damage later on.
Essential Tools and Anchors for Reliable Eye Screw Installation
Required tools: drill, bits, stud finder, and measuring tape
Getting the job right requires a few key tools: a variable speed drill, the right drill bits for whatever material needs boring (wood, brickwork, metal), and a decent stud finder. Measure carefully with a tape measure to space things properly, and don't forget the level to keep everything straight. Safety gear matters too. Those safety glasses and gloves save headaches later, particularly when working with plaster walls or concrete blocks that throw up all sorts of dust and chips. When dealing with stuff that needs serious tightening power, grab a torque wrench. Trust me, it saves a lot of frustration down the road when those screws stay put without tearing out or cracking the surrounding wall.
Selecting the right wall anchor: expansion, plastic, and toggle bolts
Choose anchors based on wall type and load:
| Anchor Type | Best For | Max Load Capacity | Installation Notes |
|---|---|---|---|
| Plastic expansion | Drywall | 25–50 lbs | Requires precise hole sizing |
| Toggle bolts | Hollow walls | 100–150 lbs | Wings must fully open behind wall |
| Sleeve anchors | Concrete/masonry | 200+ lbs | Needs hammer drill for setting |
| Match the anchor to both the wall material and the wall hanging eye screw’s rating for optimal performance. |
Best practices for using power tools with wall hanging eye screws
When drilling pilot holes, aim for a right angle so everything stays straight. Switch to hammer drill mode when working with masonry surfaces, and don't forget to blow out all the dust first before putting in those anchors. Start tightening those eye screws by hand first to get the threads engaged correctly, then switch to a screwdriver or wrench once they're seated. Watch out for sudden resistance though because that's usually a sign something might crack or strip if pushed further. Keep checking things with a level throughout the whole process. Even small deviations can cause big problems later on, especially when dealing with delicate wall materials.
Step-by-Step Guide to Installing Wall Hanging Eye Screws
General installation method for secure fastening
First thing's first, grab a pencil and mark where you want that thing hung. Now drill a pilot hole that's just a bit smaller than the actual screw shaft - this helps give it better hold in the wall. When inserting the wall anchor, start by turning it in by hand so the threads line up properly before switching to a screwdriver or wrench for tightening. Aim to leave about one or two threads sticking out past the surface as a visual check that everything is fully seated. If what's being mounted might experience some shaking or movement (like near a washing machine area), consider putting on some kind of thread locker stuff to keep those screws from working themselves loose after months of use.
Installing eye screws in drywall with anchors
When dealing with hollow drywall sections, plastic or toggle anchors work best for holding things in place. Start by drilling a hole that fits the anchor size just right, then push the anchor all the way until it sits level with the wall surface. Next comes driving the eye screw into position. What happens next is pretty clever actually the anchor expands behind the drywall panel, grabbing onto whatever space exists there to create something solid enough for mounting. This method really helps avoid cracking walls since it spreads out the pressure instead of concentrating it in one spot. Most quality anchors can handle around 50 pounds if everything gets put together properly, which makes them great for hanging pictures, small shelves, or other lightweight items safely on those tricky spots where regular screws won't bite.
Mounting eye screws in masonry and plaster walls
When boring into masonry, grab a hammer drill equipped with a good quality carbide bit. Drill just a little deeper than needed for the screw itself, maybe around 1/8 inch extra. Before putting anything in there, make sure to clean out all the dust and debris from the hole properly. Sometimes folks skip this step and wonder why their anchors don't hold right. If dealing with plaster that sits on top of wood lath, aim those coarse threaded screws directly at the wooden strips underneath. This helps prevent unsightly cracks forming on the surface later on. Keep applying even pressure while driving things in place. And remember, when we're talking about really heavy loads above 75 pounds, it pays off big time to use some epoxy adhesive as well. Trust me, saving money upfront by skipping this can cost way more down the road if something comes loose unexpectedly.
Achieving Accurate Placement and Level Hanging Results
Using a Spirit Level or Laser for Precise Alignment
Getting things straight on the wall matters a lot when using those eye screws for hanging stuff professionally. Laser levels are great because they cast out those nice straight lines both ways, which makes them perfect when dealing with several points across different spots. For simpler jobs where there's just one item to hang, old fashioned bubble levels still do the trick fine enough. Just put it atop whatever frame we're working with or hold it while putting in those screws. Don't forget to step back and look at things from various places too. Sometimes walls aren't perfectly flat, so checking multiple times helps catch those tiny leans before anyone notices.
Recommended Height for Hanging Artwork at Eye Level
Most people find that hanging art around 57 inches from the floor works best since this roughly matches where eyes naturally fall when standing. Of course, this can vary depending on how tall someone is or what kind of space we're talking about. When dealing with several artworks together, keeping them all aligned along similar center points generally looks better to most folks. To get things just right, take a tape measure and check from the very top edge of whatever frame we're using down to where those screws will actually go into the wall. This little extra step helps make sure everything ends up exactly where it should be visually speaking.
Techniques for Hanging Heavy Items With Balanced Support
When dealing with items weighing more than 50 pounds, it's best practice to install at least two wall hanging eye screws. These should be positioned approximately 60 percent of the object's total width from each other. The connection needs aircraft grade cable that can handle three times what the item actually weighs. Many folks forget this part but it makes all the difference in safety. For those tricky situations where the weight distribution isn't even across the object, remember the so called "two thirds rule." Simply put, position the mounting points closer to wherever most of the weight sits on the item. This helps stop things from tilting forward when hung and keeps everything properly balanced and securely suspended without any wobbling or instability issues down the road.
FAQ Section
What are wall hanging eye screws used for?
Wall hanging eye screws are used to secure items to walls, ranging from light objects like picture frames to heavier items such as mirrors and bookshelves. Special types are also useful for mounting in concrete and other materials.
How do I choose the right wall hanging eye screw?
Choose the right wall hanging eye screw based on the material you are mounting into and the weight of the item you wish to hang. Different screws work better with specific materials like wood, metal, or masonry.
What is the significance of threaded shank designs?
Threaded shank designs determine how well the screw holds in a given material. Coarse threads work best in wood, while fine threads are better for metal. Self-tapping shanks create their own holes, reducing the need for pre-drilling.
What safety margin should I consider during installation?
Always consider a 4:1 safety margin, meaning your hardware should support four times the weight of the item you plan to hang. This ensures secure installation and accounts for dynamic forces.
How can I ensure straight and level hanging?
Use a level, either bubble or laser, to ensure that installations are straight and even. This is crucial for multiple hanging points and prevents uneven distribution of weight.
Why should I use a stud finder?
A stud finder helps you locate the solid frames behind walls, which are essential for securely fastening heavy items directly to these load-bearing structures.
Table of Contents
- Understanding Wall Hanging Eye Screw Types and Material Compatibility
- Evaluating Wall Structure and Load-Bearing Requirements
- Essential Tools and Anchors for Reliable Eye Screw Installation
- Step-by-Step Guide to Installing Wall Hanging Eye Screws
- Achieving Accurate Placement and Level Hanging Results
- FAQ Section